 |
|
|
|
| |
|
|
|
|
User Manual for QCad

|
|
|
|
| |
|
|
|
| |
|
|
| | QCad offers two kind of options:
1. Preferences for the general configuration of the application and the default settings for new drawings.
2. Drawing settings which apply to the currently visible drawing. These Options get saved and restored with the drawing. | | |
|
| |
|
|
16.1 General Preferences
|
| |
|
|
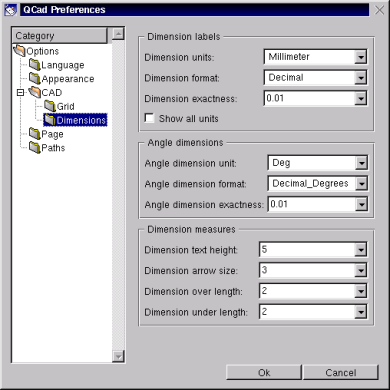
| | Choose in the menu "Options" -> "General Preferences" to show the preferences dialog for general application settings. The dialog shows a list of categories on the left side. Choose a category by clicking on a list item to show the correlative option frame. | | |
|
| |
|
|
| |
 |
|
Fig. 27: The General Preferences dialog
|
| | |
|
| |
|
|
16.1.1 Measuring System And Drawing Scale
|
| |
|
|
| | The initially shown frame allows you to choose the default unit for new drawings. If you change the unit here, some other settings get adjusted to the most common values for that unit. It's a good idea to set the unit here before changing other things. | | |
|
| |
|
|
| | There are 21 different units you can choose:
None, Inch, Foot, Mile, Millimeter, Centimeter, Meter, Kilometer, Microinch, Mil, Yard, Angstrom, Nanometer, Micron, Decimeter, Decameter, Hectometer, Gigameter, Astro, Lightyear, Parsec. | | |
|
| |
|
|
| | Choose "None" if you don't want to use units at all. This can be useful, if you want to be independent of units. If you change the unit of an existing drawing to "None", it gets not scaled. Also if you change the unit from "None" to anything else, no unit conversion is done. | | |
|
| |
|
|
| | None | Don't use units. | Inch
Foot
Yard
Mile | English measuring system. | Millimeter
Centimeter
Decimeter
Meter
Decameter
Hectometer
Kilometer
Gigameter | Metric measuring system. | Microinch | 1/1 000 000 of an Inch. | Mil | 1/1 000 of an Inch. | Angstrom | 10e-10m | Nanometer | 10e-9m | Micron | 10e-6m | Astro | 1,496 00 � 10e11m | Lightyear | 9,460 5 � 10e15m | Parsec | 3,085 7 � 10e16m |
| | |
|
| |
|
|
Drawing Scale
|
| |
|
|
| | If you wish to work with an other scaling than 1:1 you can choose the scaling here. A paper space scaling of 0.5 (or 1:2 or 1"=2" or 6"=1'-0") means that one unit on the paper is two units in reality. So a part which is constructed with a length of 10cm gets printed with a length of 5cm. A scaling of 2 (or 2:1) means that a constructed length of 10cm gets printed with a length of 20cm. | | |
|
| |
|
|
16.1.2 Language
|
| |
|
|
| | With this option, you can choose the language of QCad. Please mail me if you like to translate QCad into an other language. The messages used in the program are all separated in the sub directory "messages". Therefore it's very easy to translate QCad into any language. | | |
|
| |
|
|
16.1.3 Appearance
|
| |
|
|
Font
|
| |
|
|
| | Choose the font name and charset for the application GUI. You should not need to change these settings usually. If you've chosen a language which requires a special charset it's chosen automatically. | | |
|
| |
|
|
Font Sizes
|
| |
|
|
| | The GUI font size is used for most GUI elements (menus, buttons, labels, ...). The grid info font size applies to the grid info shown at the bottom right of the graphic if the grid is on. The status panel font size specifies the font size for all messages shown in the status panel at the bottom of the application window. The library browser font size is used for displaying the part names under the previews in the library browser. | | |
|
| |
|
|
16.1.4 CAD
|
| |
|
|
Preview Elements
|
| |
|
|
| | QCad shows previews during moving or pasting functions. It depends on the speed of your system how many elements can be shown as preview. Lower this number if your system is too slow for showing the preview without flickering. | | |
|
| |
|
|
Snap Range
|
| |
|
|
| | If you need to specify a point, QCad offers you snap functions for exact positioning. This value is the maximum distance, the mouse cursor can be away from the actual point you wish to snap to. For example if the value is 200, the mouse cursor can be at maximum 200 pixels away from the next endpoint and it still finds it. | | |
|
| |
|
|
Mark Size
|
| |
|
|
| | In snapping mode a small red circle shows where the point would be if you click now. This value specifies the size of this circle in pixels. | | |
|
| |
|
|
Auto Redraw
|
| |
|
|
| | QCad redraws the drawing automatically after deleting elements if this check box is enabled. | | |
|
| |
|
|
16.1.5 Grid
|
| |
|
|
Grid Format
|
| |
|
|
| | The grid format can be decimal or fractional. Decimal means that the grid spacing gets multiplied by a factor of ten until it has a reasonable size. Fractional means that the grid spacing gets multiplied by a factor of two instead of ten. | | |
|
| |
|
|
Minimum Grid Width X/Y
|
| |
|
|
| | That's the minimum grid spacing used for showing the grid. Usually this setting can be chosen very small. The grid spacing gets increased like described above until it has a reasonable size. If you think you get confused by changing grid spaces, set these values to the values you wish to actually use. QCad shows the grid like you've specified it if the grid spacing does not fall below the setting "Minimum gird space" | | |
|
| |
|
|
Show Meta Grid
|
| |
|
|
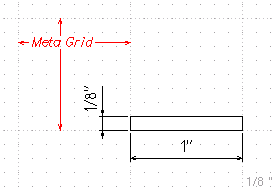
| | Tick this check box to show the metagrid. The meta grid draws lines all 10 or all 8, 16, 32, ... grid meshes, depending on the grid format. | | |
|
| |
|
|
| |
 |
|
Fig. 28: Meta Grid
|
| | |
|
| |
|
|
Autoscale Grid
|
| |
|
|
| | If this check box is ticked, QCad will scale the given grid space up if a grid mesh becomes smaller than the setting "Minimum grid space". If autoscale is off, the grid is not shown at all if the grid mesh becomes smaller than the setting "Minimum grid space". | | |
|
| |
|
|
Minimum Grid Space
|
| |
|
|
| | If this "Autoscale grid" is ticked, QCad will scale the given grid space up if a grid mesh becomes smaller than this setting. | | |
|
| |
|
|
16.1.6 Dimensions
|
| |
|
|
Dimension Unit
|
| |
|
|
| | Dimensions can be labeled in a different unit than the drawing unit. If you wish to do that, choose the unit here. | | |
|
| |
|
|
Dimension Format
|
| |
|
|
| | Dimension labels can be shown in three different formats: | | |
|
| |
|
|
| | Decimal | e.g.: 2.25mm | Fractional | e.g.: 2' 3 1/4" | Scientific | e.g.: 7.93e+03 |
| | |
|
| |
|
|
Dimension Exactness
|
| |
|
|
| | This value defines the exactness of the dimension labels. It's usually an amount like "0.001" for decimal systems and "1/128" for fractional systems. | | |
|
| |
|
|
Show All Units
|
| |
|
|
| | Tick this check box to show always the units in each label. If you don't tick this, the unit is only shown if the unit is "foot" (e.g: 2' 3 1/4"). | | |
|
| |
|
|
Angle Dimension Unit
|
| |
|
|
| | There are three possible units for dimensioning angles: Degrees, Radians and Gradians. | | |
|
| |
|
|
Angle Dimension Format
|
| |
|
|
| | You can show the labels of angle dimensions in decimal Degrees (e.g.: 12.75�), Degrees, Minutes and Seconds (e.g.: 15�30'13.5"), or decimal for Radians or Gradians. | | |
|
| |
|
|
Angle Dimension Exactness
|
| |
|
|
| | This value is the exactness for the label of angle dimensions. If the format is decimal, a value of 0.01 means that for an angle of 5.1684889 degrees, the label shows 5.17�. If the format is Degrees, Minutes and Seconds, for the same value the label shows 5�10'6.56". So the exactness applies for the degrees in the first but for the seconds in the second case. | | |
|
| |
|
|
Dimension Text Height
|
| |
|
|
| | The text height for dimension labels. | | |
|
| |
|
|
Dimension Arrow Size
|
| |
|
|
| | Length of the dimension arrows. | | |
|
| |
|
|
Dimension Overlength
|
| |
|
|
| | The part of the extension lines which goes above the arrows. | | |
|
| |
|
|
Dimension Underlength
|
| |
|
|
| | The extension lines can have a distance to the object. This value can be used to adjust this distance. | | |
|
| |
|
|
16.1.7 Page
|
| |
|
|
Type
|
| |
|
|
| | Choose a scaling type for adjusting the scale factor of the paper space. This option is only available for English measurement systems. The type can be one of Absolute, Engineering or Architectural. This setting isn't vital, it only change the possibilities of the "Drawing scale" option. | | |
|
| |
|
|
Page Format
|
| |
|
|
| | The page format used for showing the page border. Note that you must choose the page format of the printer in the printer setup dialog. It can be that QCad supports a format but your printer doesn't. You can still print to scale then, however. If you wish to use a format which isn't shown here, you can choose "User" to manually define the paper size ("Page Width/ Height"). | | |
|
| |
|
|
Page Orientation
|
| |
|
|
| | The page orientation can be "Portrait" (longer side left) or "Landscape" (longer side up). | | |
|
| |
|
|
Page Width/ Height
|
| |
|
|
| | If you choose "User" as page format, you can type here individual values for the page size. | | |
|
| |
|
|
Page Origin X/ Y
|
| |
|
|
| | This value defines the position of the absolute zero point referring to the left bottom page edge. You can also define this by moving it on the drawing using the appropriate edit function. | | |
|
| |
|
|
Show Page Border
|
| |
|
|
| | Tick this to show the page border (default) or untick to hide it. | | |
|
| |
|
|
16.1.8 Paths
|
| |
|
|
| | QCad launches a browser if the menu "Help" -> "Manual" was chosen or F1 was pressed. On this option page, you can specify the path to your favorite browser (e.g. '/opt/netscape/netscape' or 'c:\program files\netscape\netscape.exe'). However, if the browser can be started directly by typing its name on a shell, you can just type the name here (e.g. 'netscape'). If you want to use Lynx for reading the manual you must type the name of an x-terminal and start Lynx over an option of this terminal. For example if you use kvt as terminal, type: 'kvt -e lynx'. | | |
|
| |
|
|
| | Further you can define an additional path to search for part libraries. The given path and all it's sub directories get searched for parts by the object library browser. This action can take a long time if there's a deep hierarchy. So it's usually not a good idea to type '/' or 'c:\' here. | | |
|
| |
|
|
16.2 Current Drawing Settings
|
| |
|
|
| | Use this menu point for changing the settings of the currently shown drawing. You can only change settings which can get saved and restored by saving the drawing. All settings in this dialog are also available in the "General Preferences" dialog. But if you change the settings there, they will apply for all new drawings while the settings in this dialog apply only to the current drawing. | | |
|
| |
|
|
| | For a description of the drawing settings, take a look at the according section above. | | |
|
| |
|
|
[ 1-2-3-4-5-6-7-8-9-10-11-12-13-14-15-16-17-18 ]
Copyright © by Andrew Mustun 1999-2001. All rights reserved.
This Manual was created with ManStyle.
|


